
How to Use HypeProxies ISP Proxies in AdsPower 2026

Managing multiple accounts on Facebook Ads, Amazon, TikTok, or any major platform requires two things to work together: a browser that makes each profile look like a different device, and an IP address that cannot be linked back to your other accounts.
AdsPower handles the browser side — it creates isolated profiles with unique fingerprints, cookies, and storage. HypeProxies ISP proxies handle the network side — each IP is a static residential address assigned to a real ISP, so platforms see genuine-looking connections instead of flagged datacenter addresses.
When you pair the two, every profile has its own permanent identity: a unique browser fingerprint plus a unique static residential IP. This combination is widely considered the safest setup for multi-account management in 2026. This guide walks you through buying HypeProxies ISP proxies and configuring them inside AdsPower, step by step.
What You Need Before Starting
Before you begin, make sure you have the following:
- An AdsPower account — AdsPower offers a free plan that supports up to 2 browser profiles. It is enough to test the setup. You can create an account at the AdsPower affiliate link or read our full AdsPower review to understand its features before signing up.
- A HypeProxies account with ISP proxies — HypeProxies offers a $1 trial so you can test the quality before committing to a plan. Plans start at $65/month for 50 static ISP IPs, which covers 50 separate browser profiles. Read our HypeProxies review for a detailed look at performance and reliability.
Limited Time Offer — Extra 5% Off AdsPower
Save an extra 5% on any AdsPower paid plan with exclusive code ProxyGraphy. Start managing multiple accounts safely at a lower cost.
Exclusive Deal for ProxyGraphy Readers
ProxyGraphy readers save an exclusive extra 5% on AdsPower plans. Apply code ProxyGraphy at checkout to claim your discount.
Top Discount Offer on AdsPower
Use code ProxyGraphy at AdsPower checkout to get an extra 5% off — valid on Base, Pro, and Enterprise plans.
Exclusive 10% Off Any HypeProxies Plan
Use coupon code PROXYGRAPHY10 at checkout for 10% off any HypeProxies plan — unlimited bandwidth ISP proxies from $65/month.
Each HypeProxies ISP proxy credential you receive will include five pieces of information:
- Host — the IP address or hostname
- Port — the connection port number
- Username — your proxy authentication username
- Password — your proxy authentication password
- Protocol — HTTP or HTTPS
Keep these credentials accessible — you will enter them directly into each AdsPower profile.
Part 1: Buying ISP Proxies from HypeProxies
Step 1: Go to the HypeProxies ISP Proxies Page
Visit hypeproxies.com/proxies/isp-proxies directly, or navigate from the homepage and select "ISP Proxies" from the product menu.
You will see the ISP proxy plans with pricing per IP and all included features (unlimited bandwidth, unlimited threads, 10Gbps speed).
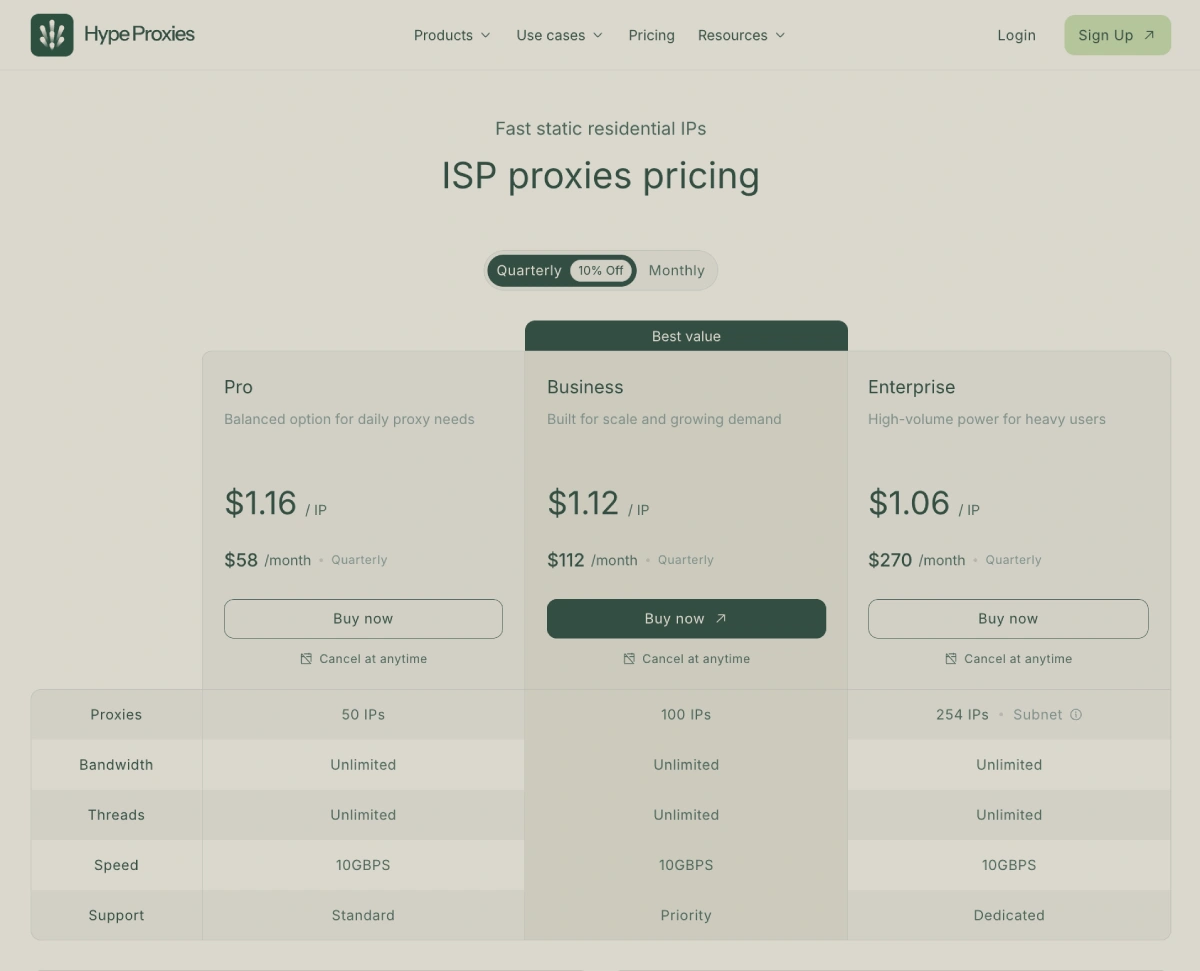
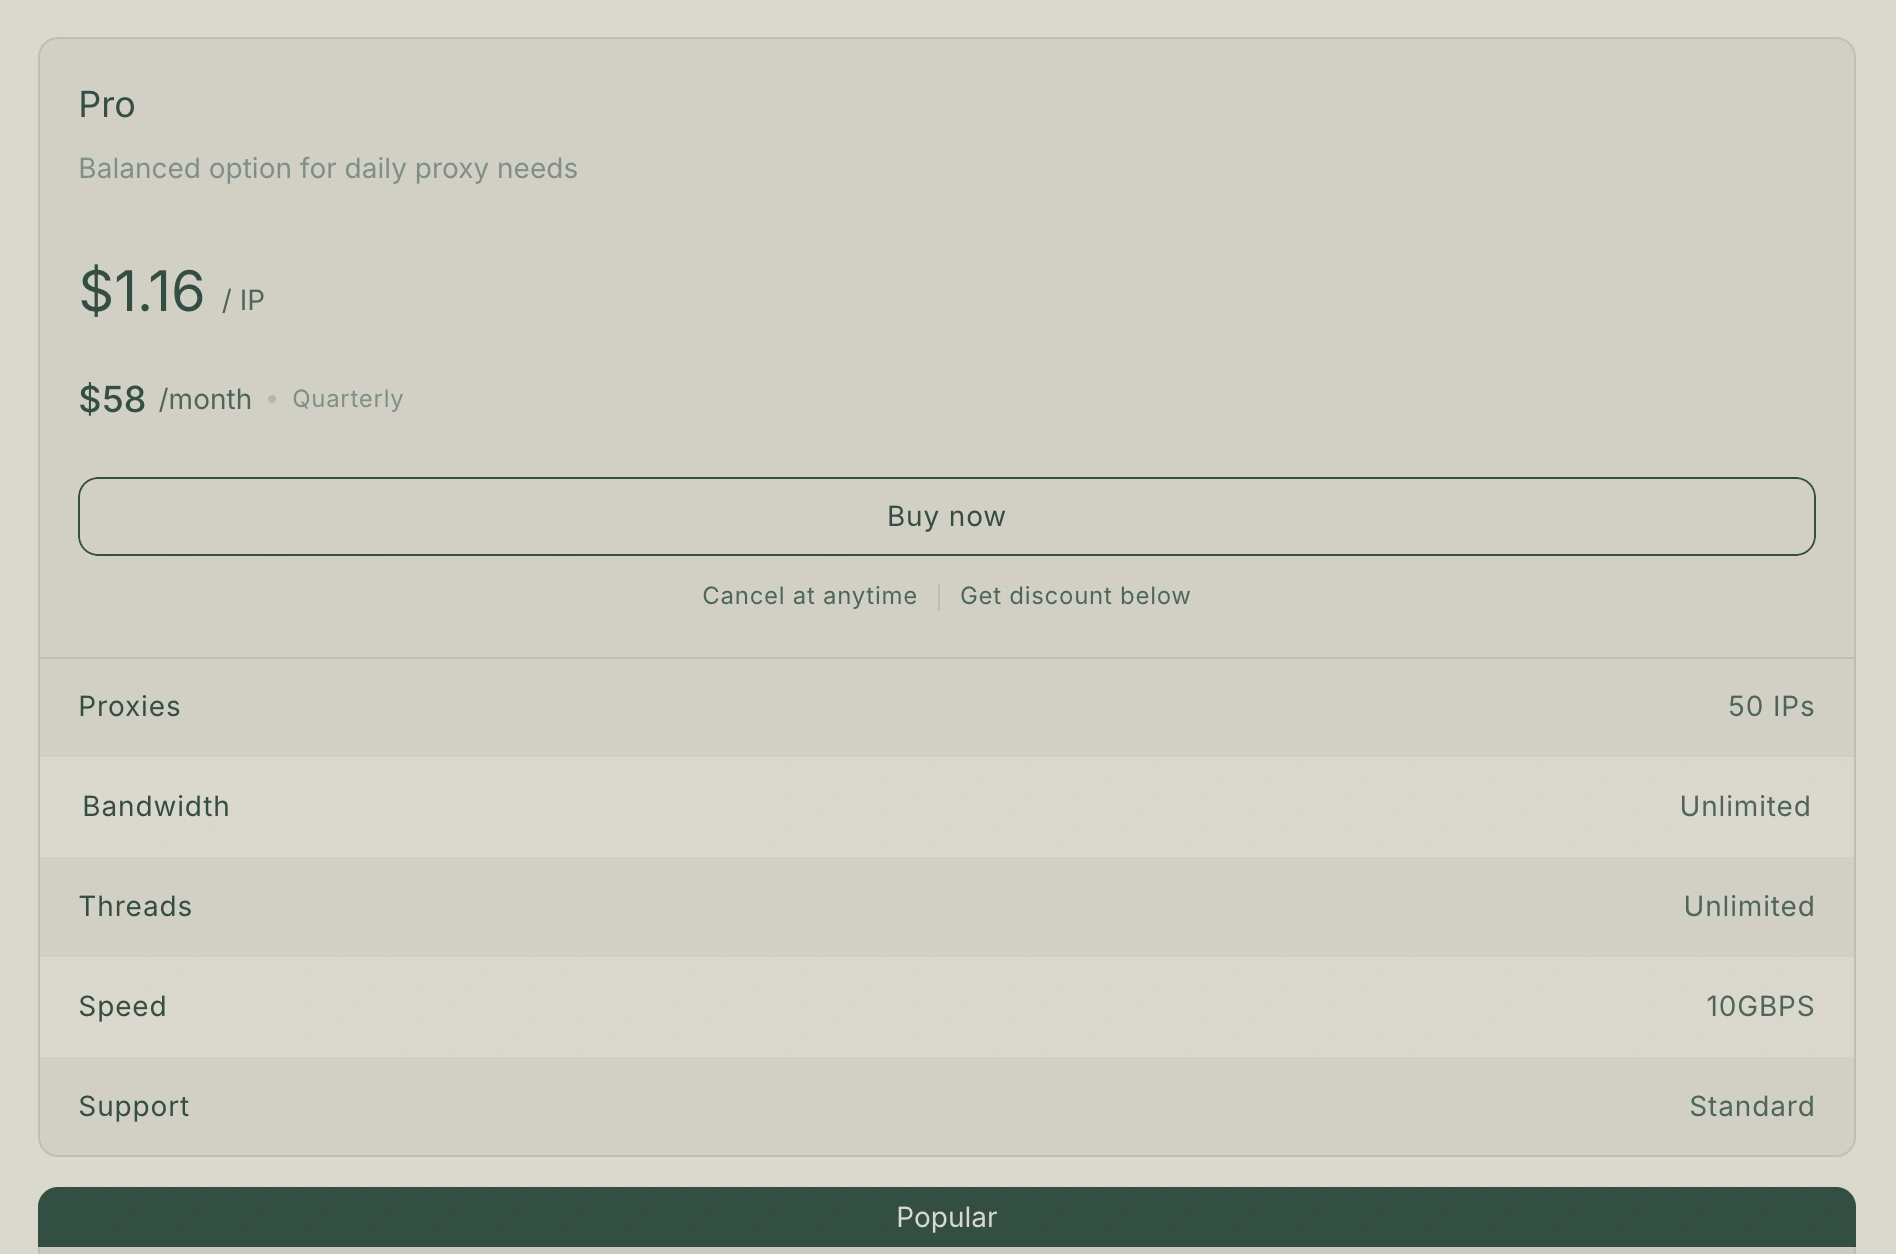
Step 2: Choose the Right Plan for Your Profile Count
HypeProxies ISP proxy plans are structured around the number of IPs you need. Since the best practice is one unique IP per browser profile, match your plan to how many AdsPower profiles you manage:
| Plan | IPs | Monthly Price | Quarterly Price | Price Per IP |
|---|---|---|---|---|
| Pro | 50 IPs | $65/mo | $58/mo | $1.30–$1.16 |
| Business | 100 IPs | $125/mo | $112/mo | $1.25–$1.12 |
| Enterprise | 254 IPs (/24 subnet) | $300/mo | $270/mo | ~$1.18–$1.06 |
All plans include unlimited bandwidth and unlimited threads. If you manage 10–20 profiles, the Pro plan gives you room to grow. If you run 50+ accounts, Business or Enterprise is the practical choice.
Step 3: Create Your Account and Complete Payment
Click "Buy Now" on your chosen plan. You will be prompted to create a HypeProxies account or log in if you already have one. HypeProxies accepts standard payment methods as well as cryptocurrency.
If you want to test before committing, look for the $1 trial option on the checkout page — it gives you access to a small batch of ISP proxies to verify the quality with AdsPower first.
Exclusive 10% Off Any HypeProxies Plan
Use coupon code PROXYGRAPHY10 at checkout for 10% off any HypeProxies plan before completing your purchase.
Step 4: Access Your Proxy Credentials in the Dashboard
After payment, log into your HypeProxies dashboard. Navigate to your ISP proxy order to retrieve your proxy list.
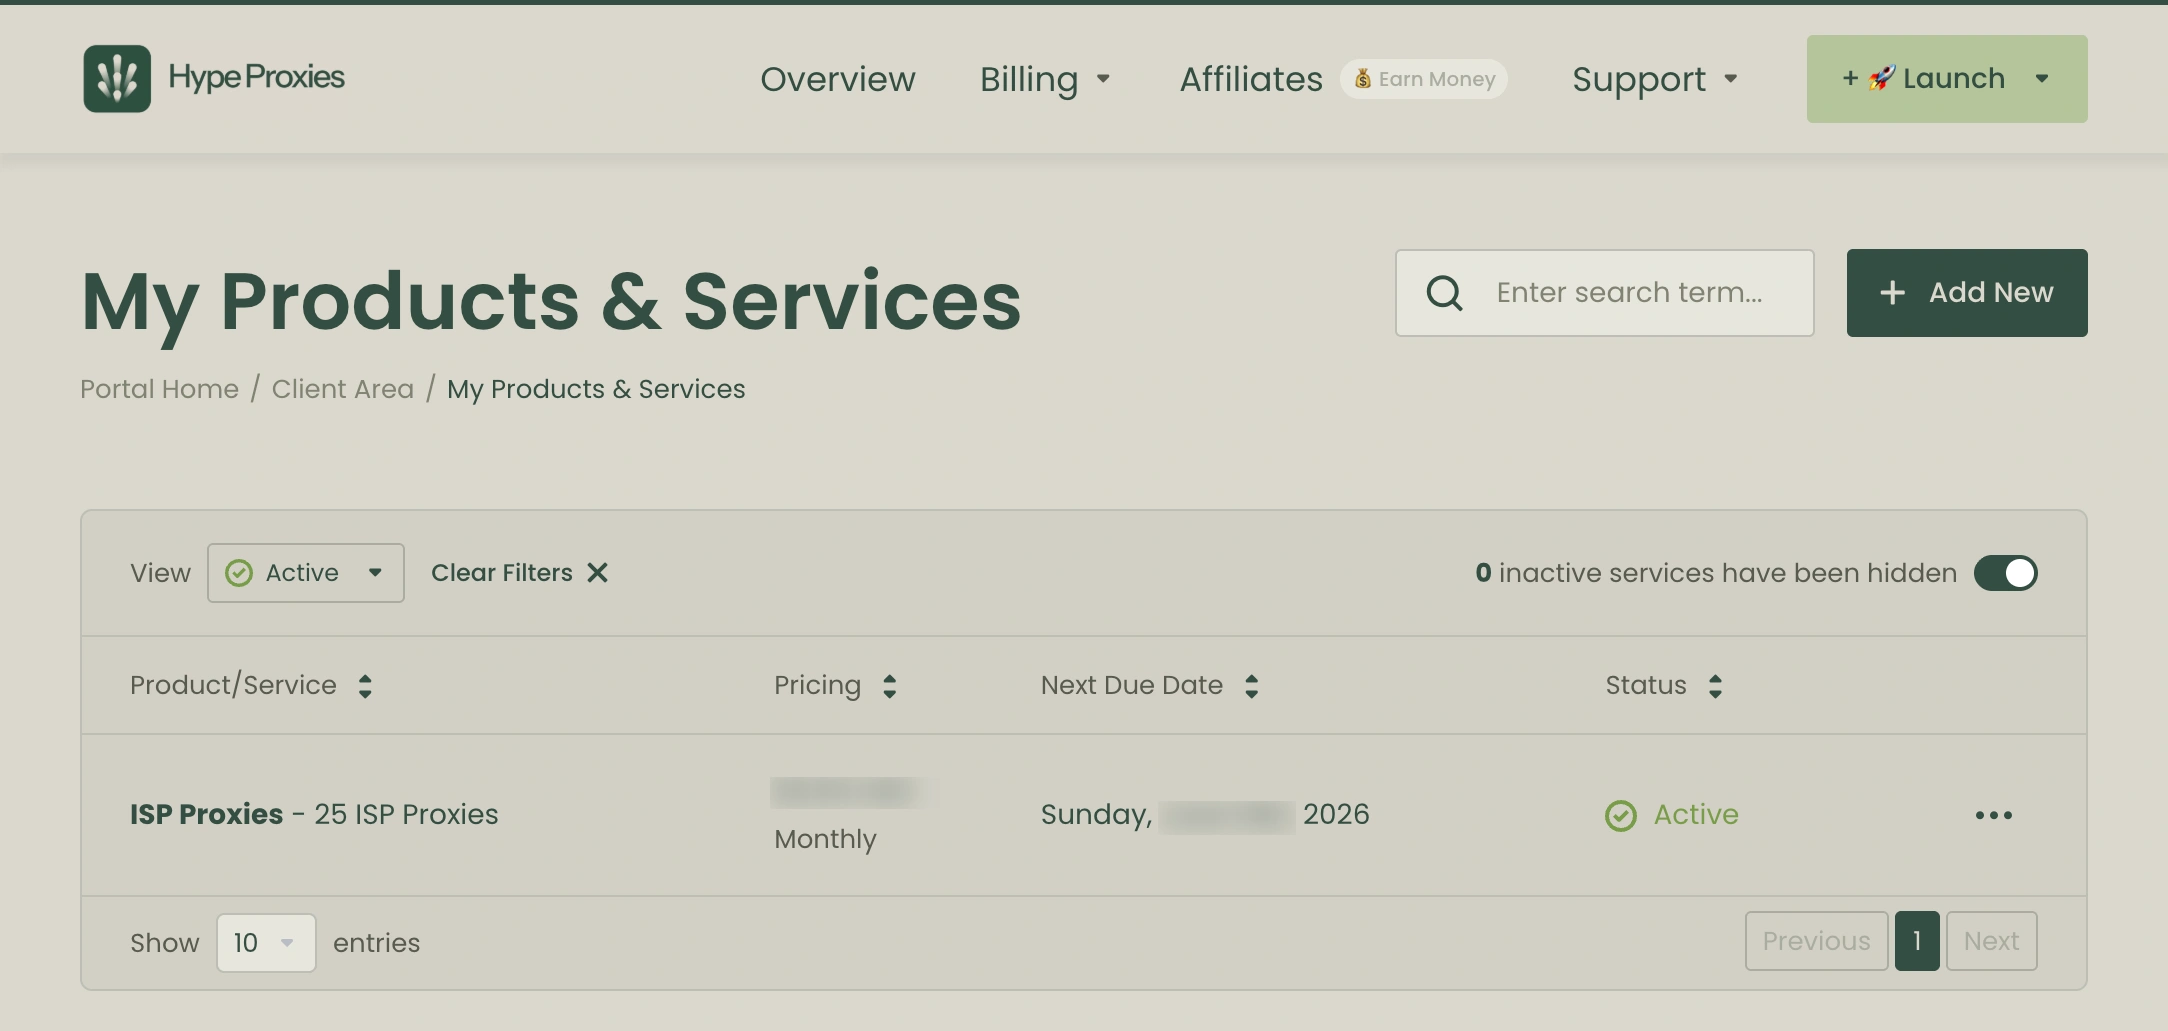
Your credentials will be listed in a format similar to:
Host: 104.xx.xx.xx
Port: 8080
Username: your_username
Password: your_password
Protocol: HTTP
Or as a single connection string: http://your_username:your_password@104.xx.xx.xx:8080
Copy these credentials — you will need them in Part 2 when setting up each AdsPower profile. It helps to export the full list and keep a local spreadsheet where you can track which IP is assigned to which profile.
Part 2: Setting Up HypeProxies in AdsPower
Step 1: Open AdsPower and Create a New Profile
Launch AdsPower and click the "New Profile" button in the top-right area of the main dashboard. This opens the profile creation window where you configure the browser environment for that account.
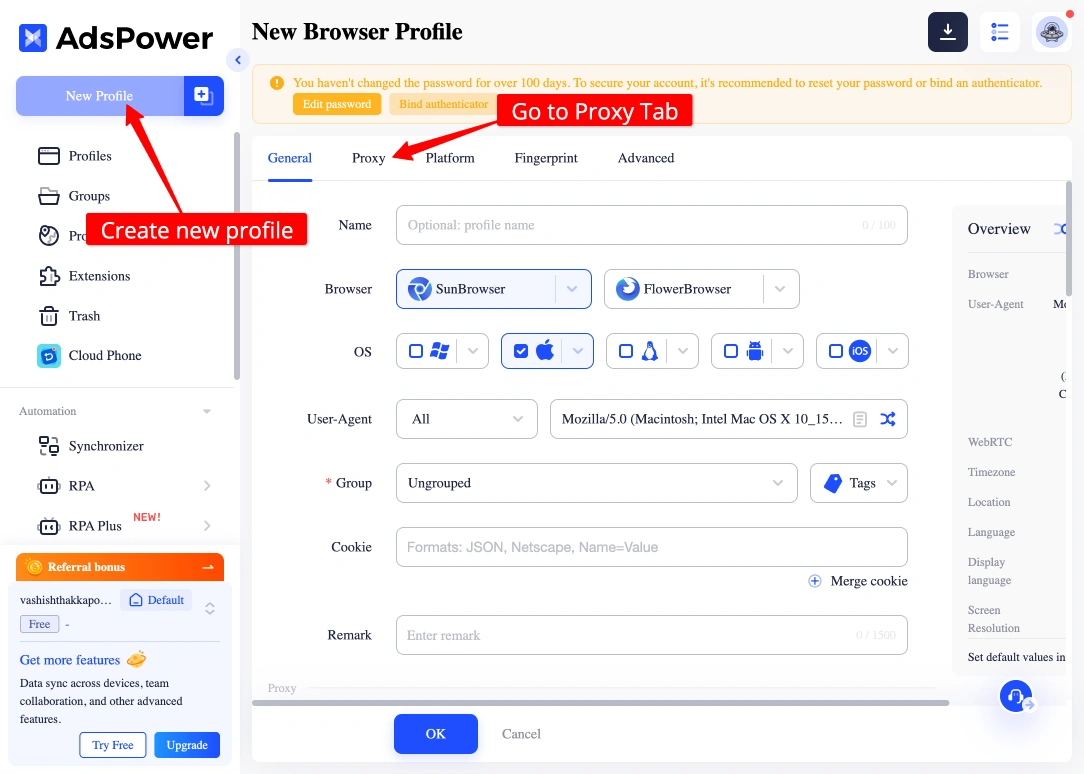
Give the profile a clear name — something that maps it to the account and proxy you are assigning (e.g., "FB Account 1 — ISP-US-01").
Step 2: Find the Proxy Section in Profile Settings
In the profile creation window, scroll down to the "Proxy" section. This is where you tell AdsPower what IP address this profile's browser traffic should route through.
By default, the proxy type may be set to "No Proxy" or "Custom." You need to switch it to use your HypeProxies credentials.
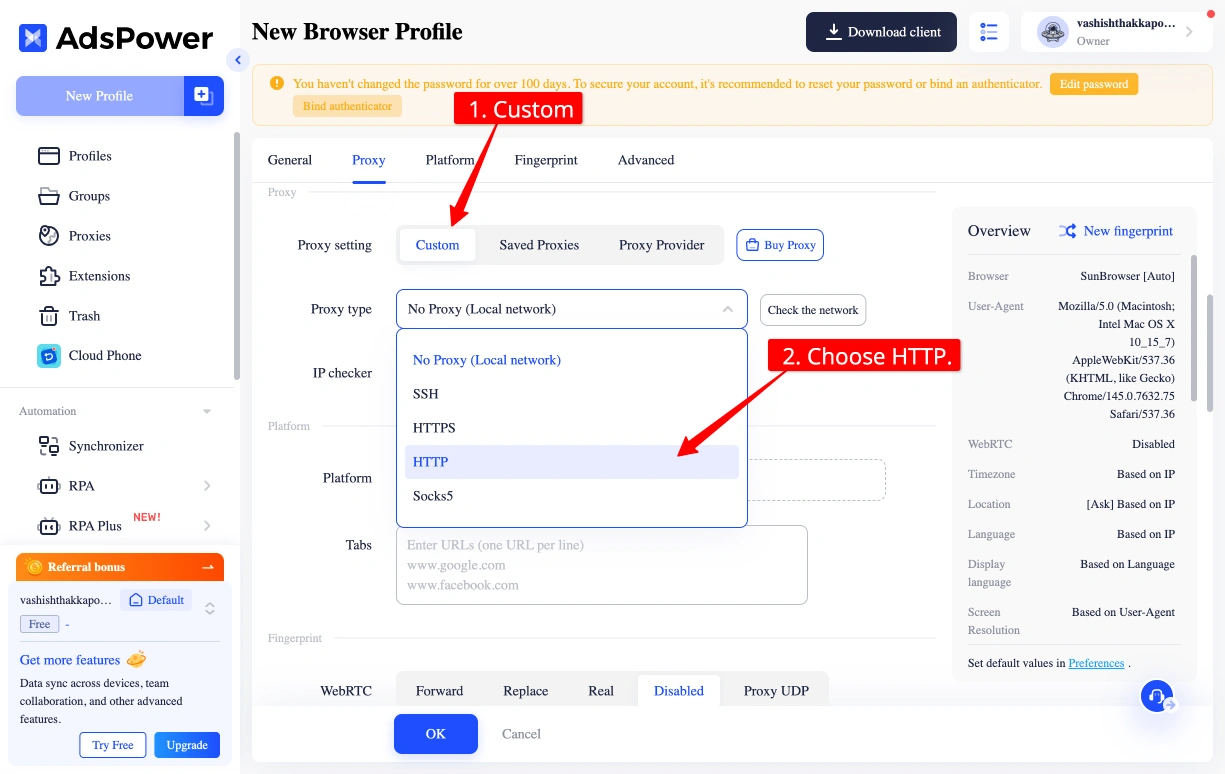
Step 3: Select the Proxy Protocol
Click the proxy type dropdown and select HTTP or HTTPS. HypeProxies ISP proxies support HTTP and HTTPS protocols. Enter the host, port, and credentials in the corresponding fields.
Step 4: Enter Your HypeProxies Credentials
Fill in the four credential fields using the information from your HypeProxies dashboard:
- Proxy Host: the IP address (e.g.,
104.xx.xx.xx) - Proxy Port: the port number (e.g.,
8080) - Proxy Username: your assigned username
- Proxy Password: your assigned password
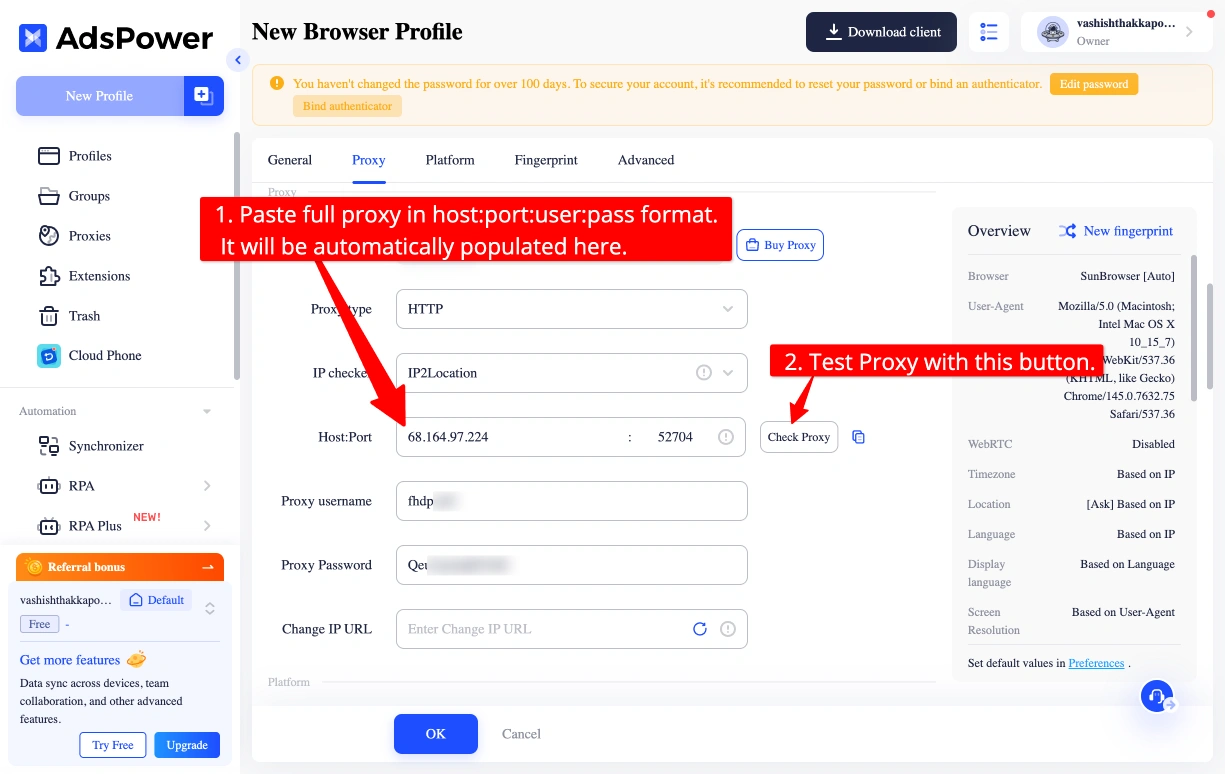
Double-check that you are using the credentials for one specific IP — not the bulk export. Each profile should get exactly one unique IP.
Step 5: Click "Check Proxy" to Verify
Before saving, click the "Check Proxy" button. AdsPower will test the connection and display the detected IP address, country, and connection status.
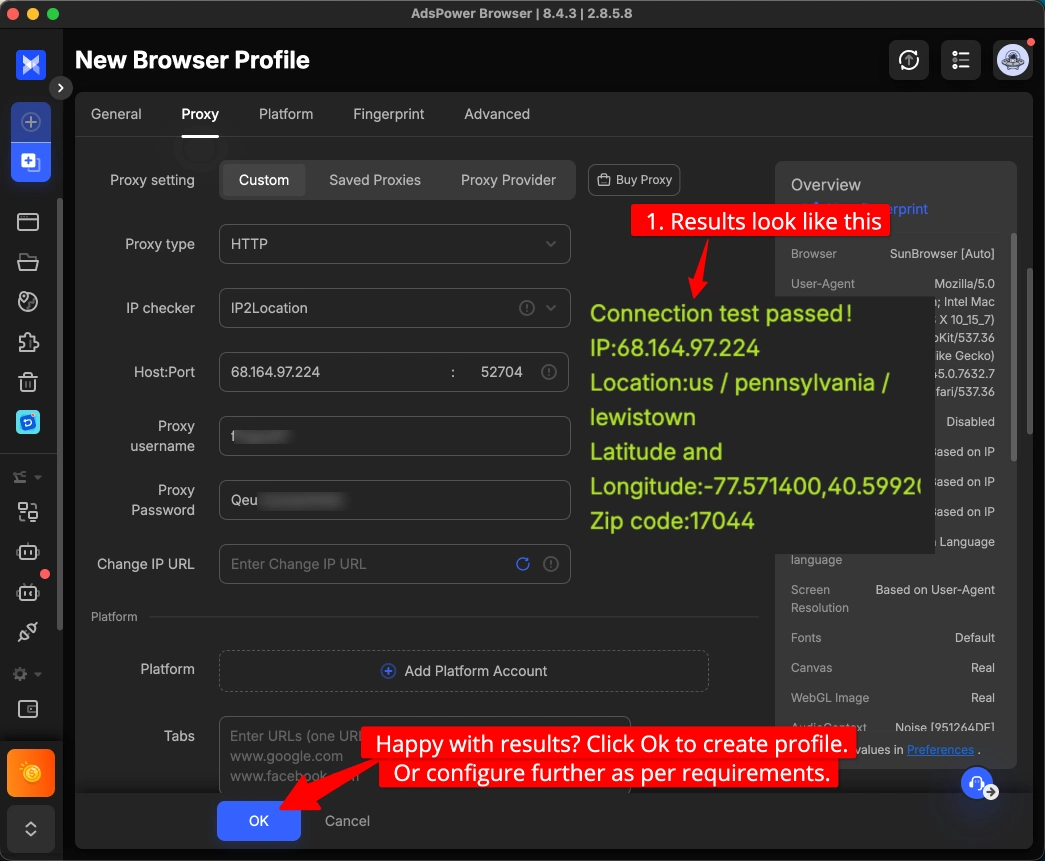
A successful check will show a green indicator with the proxy's geographic location. If it fails, see the Troubleshooting section below.
Step 6: Save the Profile and Open It
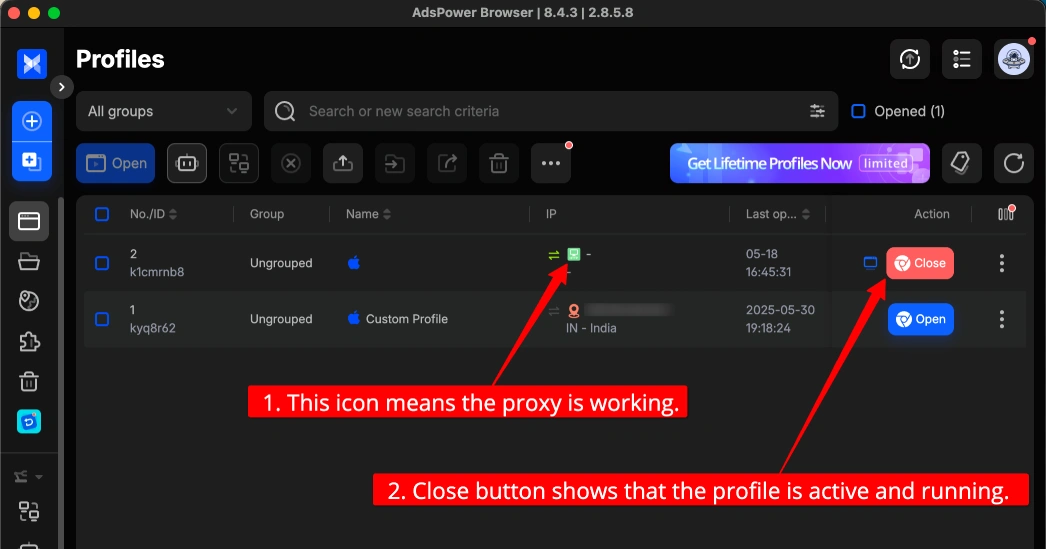
Click "Save" to finalize the profile. Back on the main AdsPower dashboard, find the profile and click "Open" to launch the browser window.
The browser that opens is using your HypeProxies ISP IP. Any account you log into from this window will see that IP — and only that IP — for as long as you keep the proxy assigned.
Step 7: Repeat for Every Profile
For each additional browser profile you create, assign a different HypeProxies ISP IP. The goal is a strict 1:1 ratio — one unique IP per profile, never shared. This is what prevents platforms from connecting your accounts through network-level fingerprinting.
Best Practices for Multi-Account Management
Following these practices will reduce account detection risk:
- Stick to a 1:1 IP-to-profile ratio. Never share an ISP proxy IP across two AdsPower profiles. If two profiles share an IP, any platform that logs IP addresses can link them.
- Use HTTPS over HTTP when available. HTTPS encrypts your proxy traffic for better privacy.
- Match proxy location to account registration location. If an account was created in the US, assign a US ISP proxy to that profile. A sudden location change raises red flags on most platforms.
- Keep profile assignment consistent. Once you assign IP #12 to Profile #12, do not swap it to another profile. Static ISP IPs are meant to stay static — that consistency is a key reason they work better than rotating proxies for antidetect browser setups.
- Disable WebRTC in each profile. AdsPower has a WebRTC setting in the fingerprint configuration for each profile. Set it to "disabled" or "replace" to prevent the browser from leaking your real IP through WebRTC requests, which bypass proxy settings.
- Never log into two accounts from the same AdsPower profile, even briefly. Platform cookies and session data within a profile can cross-contaminate if you switch accounts inside one browser window.
Troubleshooting Common Issues
"Proxy check failed" in AdsPower
This is almost always a credentials issue. Verify:
- You copied the correct host, port, username, and password — no trailing spaces
- The port number is entered correctly as shown in your HypeProxies dashboard
- Your HypeProxies subscription is active and the proxy has not expired
Connection timeout when opening profile
Verify your HypeProxies subscription is active and the proxy credentials are entered correctly. Try switching between HTTP and HTTPS in the AdsPower proxy settings to see which works on your network.
Suspected IP leak — WebRTC showing real IP
Open AdsPower profile settings, go to the Fingerprint or Browser configuration section, and find the WebRTC setting. Set it to "Disabled." Then re-run a WebRTC leak test from within the profile window to confirm the leak is resolved.
Account still getting flagged despite proxy setup
If you are getting flagged even with unique ISP proxies and isolated profiles, check these areas:
- Browser fingerprint uniqueness — ensure each AdsPower profile has distinct fingerprint settings (canvas, WebGL, fonts, timezone) rather than identical defaults
- Behavioral patterns — platforms also flag accounts for identical activity patterns (same posting time, same content cadence), so vary human behaviors across profiles
- Account warmup — new accounts that jump immediately into high-volume activity get flagged more often; warm up each profile over several days with natural usage first
Is This Setup Worth It?
The HypeProxies + AdsPower combination works because it addresses the two primary vectors platforms use to detect multi-account activity: browser fingerprinting and IP correlation. AdsPower handles fingerprinting; static ISP proxies handle IP correlation.
For advertisers, sellers, or social media managers running more than a handful of accounts, the cost math is straightforward. HypeProxies Pro at $65/month gives you 50 static ISP IPs. AdsPower's paid plans start at a few dollars per month and cover hundreds of profiles. The combined cost per protected account is low relative to the revenue risk of losing accounts to bans.
For a deeper dive into both tools, see our full HypeProxies review, our full AdsPower review, and explore how AdsPower compares to other options in our best antidetect browsers guide.
FAQs
Can I use HypeProxies with AdsPower?
Yes. HypeProxies ISP proxies work with AdsPower through the standard proxy configuration in each browser profile. AdsPower supports HTTP and HTTPS proxy types, both of which HypeProxies provides. You enter the host, port, username, and password directly in the profile settings, then use the built-in proxy checker to verify the connection before opening the profile.
How many ISP proxies do I need for AdsPower profiles?
You need one unique ISP proxy IP for each browser profile you intend to use simultaneously. If you manage 20 accounts, you need 20 unique IPs. HypeProxies' Pro plan provides 50 IPs at $65/month, which is enough for 50 separate AdsPower profiles. The Business plan covers 100 profiles at $125/month.
What proxy protocol should I use in AdsPower?
HTTP or HTTPS is the protocol to use with HypeProxies ISP proxies in AdsPower. Select HTTP or HTTPS in the AdsPower proxy type dropdown and enter your host, port, username, and password from the HypeProxies dashboard.
How do I verify a proxy is working in AdsPower?
After entering your proxy credentials in the AdsPower profile settings, click the "Check Proxy" button. AdsPower will connect through the proxy and display the detected IP address, country, and ISP. A green status means the proxy is working correctly. You can also open the profile and visit an IP lookup site to confirm the displayed IP matches your HypeProxies credential.
Is HypeProxies compatible with AdsPower's proxy checker?
Yes. HypeProxies ISP proxies are fully compatible with AdsPower's built-in proxy checker. The checker supports HTTP and HTTPS protocols, both of which HypeProxies provides. If the checker returns an error, it is typically a credentials mismatch or an inactive subscription — not a compatibility issue between the two services.